Home » Posts filed under Pattern
Pattern Engineering
Pattern Engineering: Pattern engineering is the technique of working with a 2D medium (i.e. paper or fabric) to develop blocks (using either body or garment measurements) which will assist in making garments to drape a 3D body to achieve the desired fit with optimum utilization of resources. A pattern is a map! Can you imagine a bad map that will require you to ask for clarifications on every turn? You may never get to your destination or if you finally do get there, it may be too late. And like landmarks for turns and stops on maps, an engineered pattern should have the correct notches, drill holes for placements of pockets, and engineered seams with proper corners etc. that reflect instructions graders, marker makers, spreaders, cutters and sewers are supposed to follow. 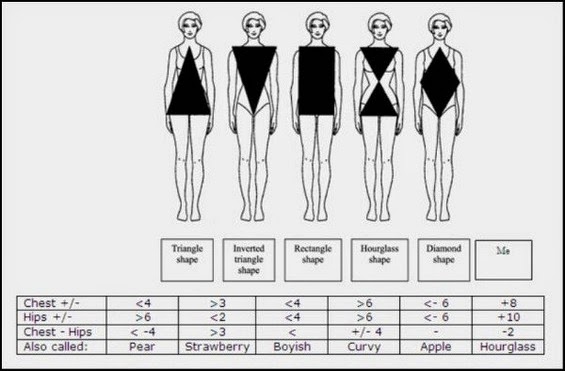 |
| Pattern measurement of human body |
It is extremely important to STANDARDIZE the process and the instructions that go along with it. It’s also important to train all the readers and users of this ‘map’ to read the same information in the map that was put in there by the maker. And standardization along with organization-wide training adds tremendously to the reduction of errors and increase in efficiency. The key components influencing pattern engineering is as follows: - Body shape vs. garment shape
- Garment fit
- Fabric properties
- Garment assembling techniques
- End use.
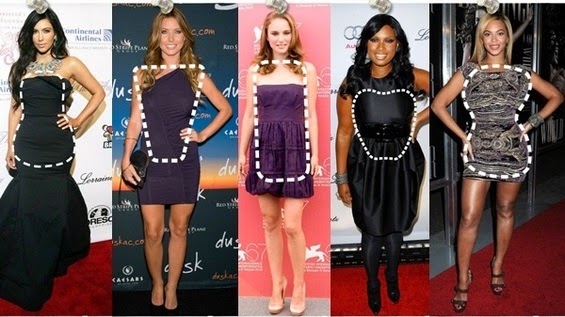
Body shape vs. Garment shapeThe shaping in human body is primarily in two main areas – the side of the body and the depth of the body. The shape on the side of the body is addressed by shaping the side seam of pattern to bring the garment closer to the body on the side. The depth of the body in front is around bust and waist and in back is around shoulder and small of back. This shaping is more pronounced in case of women body and has to be addressed by folding in the surplus fabric to shape the body contours. This folded fabric is called darts. 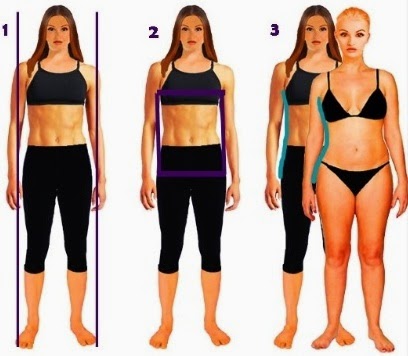 |
| Body Shape |
 |
| Garment Shape |
Garment Fit The desired fit of a garment is defined by the function for which it is intended. The required fit can be obtained by developing a suitable basic block generated from body dimensions. Basic block (for garments made from woven fabric) could be loose fitted, semi fitted or fitted. Loose fitting blocks are much bigger than the body girth measurements, the extra spacing between the wearer and the clothing being the ease. Bigger the ease, looser is the garment. Essentially, loose fitting garment block is one where the garment is more than 5” bigger than the body hip and chest girth measurements. It has a boxy shape, i.e. dimensions at chest, waist and hip are equal, and therefore falls away from the body. Such blocks are used in the production of shirts windcheater and rain coat. 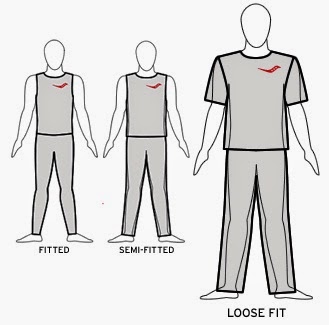 |
| Garment fitting |
Semis fitted blocks are shaped closer to the body on the side. The blocks have chest and hip girth measurement 2- 4” bigger than the body measurement while waist is 6-8” bigger than the actual waist measurement. Fitted blocks are required when garment is to be made fitted around the body and fullness of the garment around the body is required to be reduced such as uniforms, swimsuits or action wear, etc. In such garments, the shape of the body at the front as well as the sides needs to be addressed in the block. The blocks therefore are shaped in the circumference as well as the depth. When using woven fabric in such applications, typically the blocks have chest, waist and hip girth measurement 2-4” bigger than the body measurement. Fabric Properties Fabric is a key element in fulfilling the desired function for which the garment is being designed. Each fabric type has its own unique properties and characteristics; inputs regarding these are required to develop the pattern in order to achieve the desired comfort, fit and functionality. Properties of the material selected determine the dimensions of the final block as the behavior and characteristics of the fabrics. For example, while working with knitted fabrics, a key fabric characteristic is the “stretch” which can vary from 18% to 100% or more. Also, the direction of stretch is a critical element here, wherein the fabric may have one way (cross-wise), 2 way (both length and cross-wise) or 4 way stretch (all directions). Functional garments, where such fabrics are used are action wear, exercise wear, sportswear and swimwear. Garment Assembling The desired functionality of the garment and the constraints imposed by function and aesthetics, guide and define the selection of openings and closures, trims, seam types and seam finishes for a garment. Such inputs are required at the time of pattern making in order to make provisions for the same. 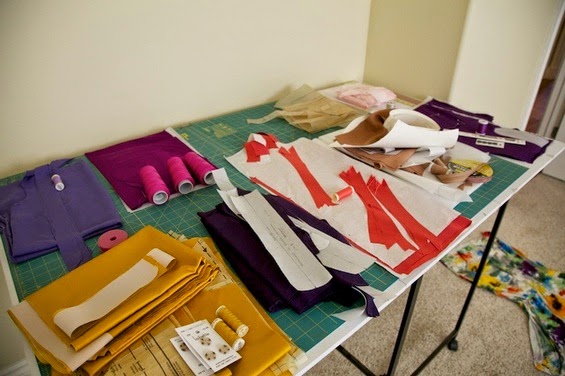 |
| Garment Assembling |
End Use Comfort, coverage and protection are the key requirements from any garment. For functional garments, inputs regarding the specific intended end use are required to develop the patterns. In fact, the entire concept of engineering of standard pattern designs revolves around achieving this specific end usage and governs the pattern engineering techniques employed. 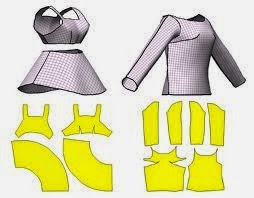 |
| End uses of pattern |
Garments Pattern Making Methods
Pattern Making Pattern making is a highly skilled technique which calls for technical ability, and a sensitivity to interpret a design with a practical understanding of garment construction. For successful dress designing pattern making forms the fundamental step. This function connects design to production by producing paper templates for all components such as cloth, hemming, fusible etc. which have to be cut for completing a specific garment. Pattern making is an art. It is the art of manipulating and shaping a flat piece of fabric to conform to one or more curves of the human figure. Pattern making is a bridge function between design and production. A sketch can be turned into a garment via a pattern which interprets the design in the form of the garment components. A pattern is flat while the body is not. The body has height, width and depth. Within this roughly cylindrical framework there are a series of secondary curves and bulges, which are of concern to the pattern maker. Darts are the basis of all pattern making. They convert the flat piece of cloth into a three dimensional form, which fits the bulges of the body. A pattern maker typically makes a pattern from a flat sketch with measurements or a two dimensional fashion illustration. The basic pattern is the very foundation upon which pattern making, fit and design are based. The basic pattern is the starting point for flat pattern designing. It is a simple pattern that fits the body with just enough ease for movement and comfort. Methods of Pattern Making Pattern making involves three methods- - Drafting
- Draping
- Flat paper pattern making
01. Drafting: It involves measurements derived from sizing systems or accurate measurements taken on a person, dress or body form. Measurements for chest, waist, hip and so on, and ease allowances are marked on paper and construction lines are drawn to complete the pattern. Drafting is used to create basic, foundation or design patterns. MEASUREMENTS Bust – measure just under the arms around the fullest part of chest. Waist – measure around narrowest part of torso. High Hip – measure 6 inches [15.5 cm] below waist around the hips. Back-waist length – measure from nape of neck to waist level Shoulder length – measure shoulder from ball socket to side of neck. Armhole depth – measure from nape of neck to under arm level. Back width – measure from armhole to armhole across shoulder blades. Neck – measure around base of neck. Tools use for Drafting A: Tape Measure This is likely something you already have in your stash, because if you have been making clothing you should have been measuring your body along the way! If not, pick up a good quality fiberglass tape measure today so you can start your pattern making off right with correct body measurements. B: Seam Ripper Like the tape measure, you probably have a seam ripper. You will use this in patternmaking for taking out your basting stitches when you move from the muslin fitting to the pattern drafting stage. C: Fine Point Sharpie Marker Muslin versions are always ugly because they are marked up, but you want to make your markings with a permanent and fine point. I like these push-button fine point sharpie pens as the cap always seems to get lost in my studio! These are quick and easy to use. D: Tracing Wheel To take your markings from the muslin stage to the patternmaking stage, this tool will pierce through the paper and leave behind marks to draft with a mechanical pencil. E: Rotary Cutter I like using my rotary cutter for the big broad strokes of cutting muslin. Make sure to use a cutting mat beneath your item to protect the cutting surface of the table underneath! F: Fabric Scissors Sharp, high-quality scissors are used for all your fabric cutting in sewing and patternmaking. These will shape the muslin down to the proper size after you have cut it big and broad with the rotary cutter. G: Tracing Paper I personally do not use this, but many designers like it for leaving marks behind on their muslins. I like a sharpie or tracing wheel, but try these sheets out and perhaps you will love them! Many people do. H: Scotch Tape It is inevitable that you will need to tape pattern pieces together and I find that basic Scotch tape is the best for this. I: Clear Rulers Having a variety of clear rulers in different shapes and sizes is essential in your kit for patternmaking. I like having a little one for marking in tiny areas, long ones for making marks for pin tucks, side seam lines, and other parts of the patternmaking process that call for something longer than average. I also have a quilting square with diagonal lines for helping square up corners and creating angles. J: Right Angle This is also a huge help in creating perfect 90 degree angles on your pattern. These are also available in clear plastic, which most people prefer. I have had this black one since art school and still use it. K: Curved RulersTo shape arm holes, hip curves, hems and other lines that are not straight in patternmaking, it is essential that you have a few different curved rulers to get the proper slope in your pattern. 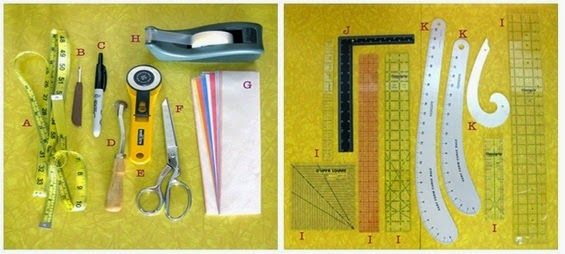 |
| Tools use for Drafting |
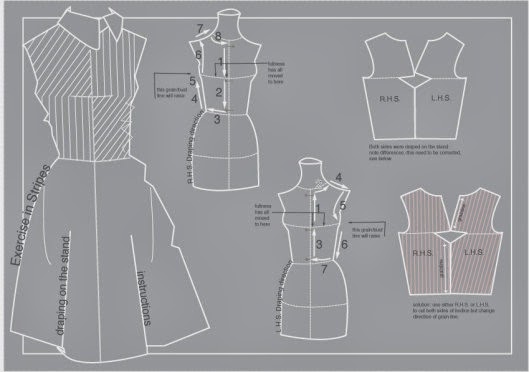
02. Draping: It involves the draping of a two dimensional piece of fabric around a form, conforming to its shape, creating a three-dimensional fabric pattern. Ease allowances for movement are added to make the garment comfortable to wear. Advantage of draping is that the designer can see the overall design effect of the finished garment on the body form before the garment piece is cut and sewn. However, it is more expensive and time consuming than flat pattern making. Draping can be made on a Human body or on a stand. 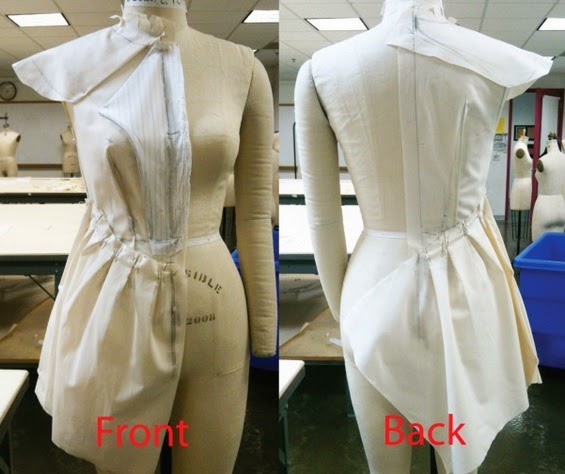 |
| Add caption |
03. Flat Pattern Making: It involves the development of a fitted basic pattern with comfort ease to fit a person or body form. A sloper is the starting point for flat pattern designing. It is a simple pattern that fits the body with just enough ease for movement and comfort. Five basic pattern pieces are used for women’s clothing. They include a snug-fitting bodice front and bodice back with darts and a basic neckline, a sleeve and a fitted skirt front and back with darts. However, as fashion changes frequently women’s styles fluctuate frequently. These basic slopers are then manipulated to create fashions. Nowadays draping is also tested by Computer aid techniques. A basic sloper has no seam allowances, which facilitates its manipulations to various styles. It has no design interest, only construction lines are marked on it. It is necessary that the basic structure of a sloper should be such that adjustments can be introduced easily. For a good pattern making, accurate measurements are of utmost importance. 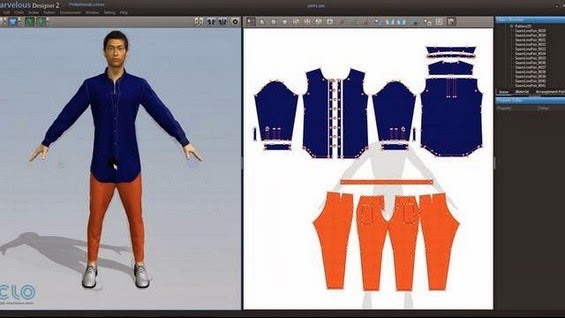 |
| Pattern making by CAD system |
The flat pattern making method is widely used in the ready-to-wear market because it is fast and accurate (Aldrich).
Methods of Garment Pattern Grading
Pattern Grading Pattern Grading is the process whereby patterns of different sizes are produced from the original master pattern. This process can be performed manually or automatically by a computerized system. Patterns are graded according to size charts which present the sizes and the average measurements of the population group for which the garments are intended. 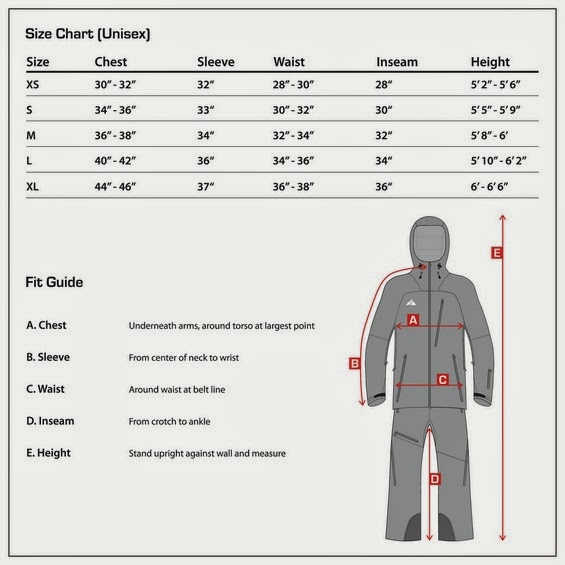 |
| Garment Pattern Grading |
Methods of Grading There are three basic methods of grading: cut and spread, pattern shifting, and computer grading. No one method is technically superior and all are equally capable of producing a correct grade. 01. Cut-and-spread method: The easiest method, which is the basis of the other two methods, is to cut the pattern and spread the pieces by a specific amount to grade up, or overlap them to grade down. 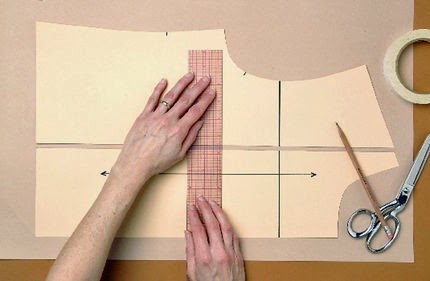 |
| Cut-and-spread method |
02. Pattern shifting: Pattern shifting is the process of increasing the overall dimensions of a pattern by moving it a measured distance up and down and left and right, (using a specially designed ruler) and redrawing the outline, to produce the same results as the cut-and-spread method.  |
| Pattern shifting |
03. Computer grading: This is the fastest method, but tends to be an investment only larger manufacturers can afford. However, sophisticated home computer software is becoming affordable. 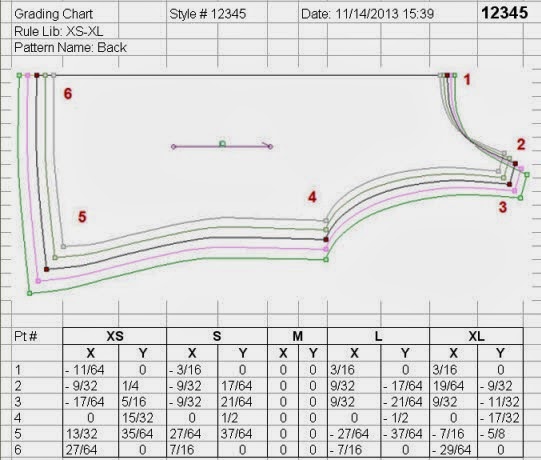 |
| Computer grading |
Today most manufacturers grade pattern on CAD systems. The pattern maker guides a cursor around the edges of the sample pattern on a digitized table. At each of the key points, he or she pushes a button to record a grade point. Each point is cross referenced by a grade-rule table stored in the computer, which enlarges or reduces the pattern automatically according to the predetermined direction. If the pattern was originally made by computer, data are already in the computer and can be enlarged or reduced automatically. 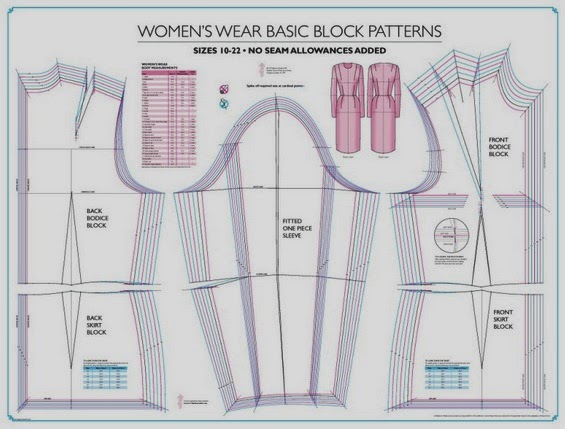 |
| Basic block pattern for female |
It is necessary to draw the Grade lines from where the grading is done. As from those lines the increasing or the decreasing of measurements will be done. 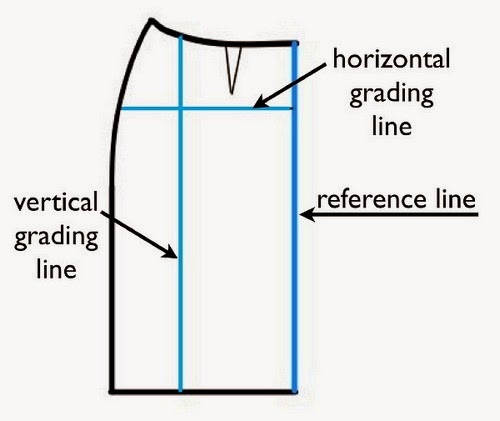 |
| Pattern line grading |
Importance of Garment Production Pattern Instructions
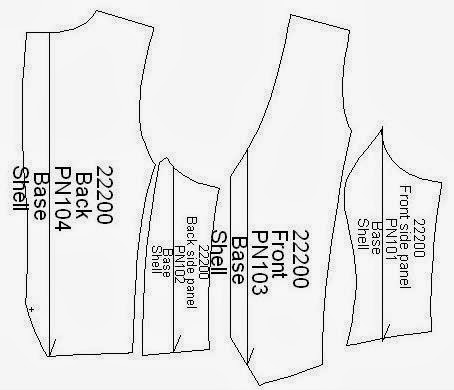
The Instructions to be sent to the Production Department by the Pattern Maker is called Production Pattern Instructions. Following instruction must be marked on apparel pattern, to enable the garment to be made up correctly: - - Style Number : This refers to the identical number for the garment/ Style.
- Name of the part : This means which part of the panel e.g. Front (FR), Back (BK)
- Size : This will show you how to find your size on a pattern finished garment measurements. E.g. UK Size 12, 14, 16….
- Grain Line : All patterns must have grain lines. It indicates the length direction of fabrics, i.e. during marker making all patterns must be placed to the length direction.
- Balance Mark : Used to ensure patterns are sewn together at the correct points.
- Construction Lines : These include buttonholes, pocket placing etc.
 |
| Production Pattern |
Other than above mentioned Instructions there are some more. And they are:
Cutting lines : On single-size patterns, this is a solid line; on multisize patterns, the cutting line for each size may be marked by a different type or color of line.
Seam lines : On single-size patterns, the seam line is indicated by a dashed line. On multisize patterns, seam lines are not shown or, in some cases, only the seam line for the smallest size is marked. Double straight lines: These indicate the best location on the pattern piece for adding or subtracting length from the garment.
Dots : These small solid circles are used to mark locations or points to match. Patterns may include both small and large dots and sometimes squares. Drill holes, shown as a circle enclosing a +, are like dots and may be used to mark locations within a pattern piece (for example, a patch pocket location).
Notches : Whether single or in groups of two or three, these diamonds or triangles both indicate matching points and help differentiate between seam lines. For example, a skirt back often has a triple notch along the center back seam line and a double notch at the side seams, eliminating confusion that might result in sewing the center back seam line to the side of a skirt front. Darts : These fitting features are shown as long, narrow triangles extending into the garment body. The dart center is sometimes indicated by a solid line; the dart “legs” are dashed. The dart point and seam line intersections are often marked with dots.
Pleats and tucks : Whether functional or decorative, these are marked with solid and dashed lines on the pattern pieces, sometimes in conjunction with arrows that show the folding direction. Consult the guide sheet for specific instructions on how to form the pleat or tuck. 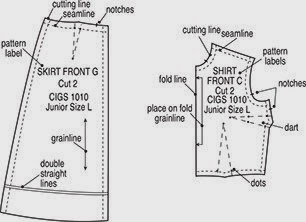 |
Picture with Instructions marked on a pattern board
|
Garment Pattern Construction

Pattern Construction: We all know that people wear variety of Garments & have a collection of different types of Garments. The Difference in Garments could be vary or due to the type of fabric used, the color or the print, weave/knit structure etc. Very often with one type of fabric & color, you can sew Garment of different styles. Have you ever thought how Garments manufacturers come out with various garment styles? First step in the process of garment manufacture is to decide on a style for a particular garment. Depending on the customer’s taste & preference the style may vary. The person who decides the style of a garment makes his decision based on several factors such as Culture, Geographical, Climate Conditions, and Social Status of the Wearer. Usually the Designer puts his ideas on a sketch. In order to make the Garments it has to translate the Three Dimensional (3D) garment to Two Dimensional (2D) shapes which when put together will form the desired Garment. This process of preparing the flat, two dimensional shapes is known as Pattern Making or Pattern Construction. And before heading to Pattern Construction it is necessary to know What a Pattern is. Pattern is a Piece of exact Size & shape of Paper with the help of which the shape & the size of the required fabric piece to construct a garment component can be cut. As a starting point of we draw a sketch of a person wearing the required garment. The next step is to draw the Front & back view of the garment. This drawing is known as the Production Sketch. Below shown is a Production sketch of a Ladies Blouse. 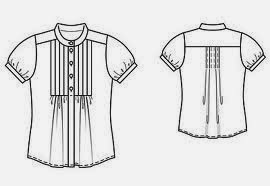 |
| Production sketch of a Ladies Blouse |
Once the Production sketch is drawn then the required Size & shape of pattern papers which will help to cut the Fabric pieces for the Production of three dimensional garments. We know that the humans have different sizes and shapes therefore in order to fit a garment to the body of a particular person his Body Measurements must be known & then it is easy to Construct the Pattern block for the required Size. Garments Sewn to the same person can have different styles. For example let us look at two Gown sewn from the same fabric to the same size with two different styles. 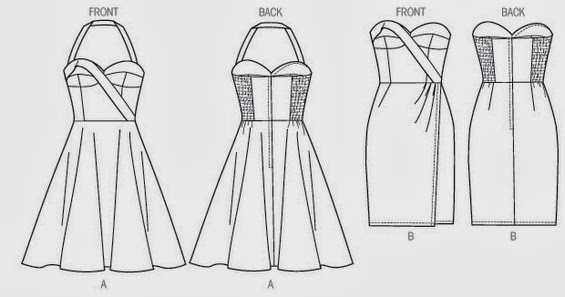 |
| Gown pattern construction |
The Gown A has a halter neck with a flared skirt whereas the gown B doesn’t has a halter neck and it has A line skirt with a tube top and an opening from side. So when in constructing a pattern those information’s on a style should be provided. The information on style includes details about pockets, grain, line of fabric, collar etc. This information can be termed as Specifications. Therefore, considering all above info we discussed we can come to a conclusion that in order to construct a Pattern it is required to have following basic information. Namely;